MacでRailsの新規プロジェクト作成する
## 今回の環境
- OSX 10.10 Yosemite
- Ruby 2.1.3(rbenvを使う)
- Rails 4.1.6
- Homebrewを使用
## やりたいこと
- Rubyの環境は、rbenvで複数バージョンを使える。
- 複数のプロジェクトがある場合でも、それぞれのバージョンで使えるようにする。
- GemはRails app内の `vendor/bundle` 内にインストールする。
## Railsをローカルインストールしプロジェクトの作成
bundlerを使用して一時的にRailsをローカルインストールする。
Railsのプロジェクトを作成したいディレクトリに移動して `Gemfile` を作成する。
```
$ cat << EOS > Gemfile
source "http://rubygems.org"
gem "rails", "4.1.6" # ←ローカルインストールしたいRailsのバージョンを指定。指定しなければ最新版が入る。
EOS
```
bundle installの実行。これでディレクトリ毎にgemをインストールすることが出来る。
```
bundle install --path vendor/bundle
```
Railsのプロジェクト作成
```
bundle exec rails new example --skip-bundle
```
不要になったディレクトリとファイルを削除
```
$ rm -f Gemfile
$ rm -f Gemfile.lock
$ rm -rf .bundle
$ rm -rf vendor/bundle
```
これで、複数バージョンのプロジェクトを管理出来るようになります。
Capistrano3でRails4のデプロイ(1)
普段はminaを利用してデプロイ作業を行っていますが、世間では[Capistrano](http://capistranorb.com/)がスタンダードらしいです。
今回はCapistranoを利用する方法を書いていきます。
## 環境
- Ruby 2.1.3
- Rails 4.1.6
- mysql 5.6.21
- Capistrano 3.2.1
## Capistranoのインストール
rbenvを使う場合です。
`Gemfile` に次のgemを追記します。
```
group :development do
gem "capistrano", '~> 3.2.1'
gem "capistrano-rails"
gem "capistrano-bundler"
gem "capistrano3-unicorn" # unicornを使う場合
gem "capistrano-rbenv"
end
```
## Capistranoで使うファイルの生成
使う環境を `STAGES` に指定します。
```
bundle exec cap install STAGES=staging,development,production
```
これでCapfileやdeploy.rbが生成されます。
## Capfileの設定
Capfileに下記を指定します。
```
require 'capistrano/setup'
require 'capistrano/deploy'
require 'capistrano/rbenv'
require 'capistrano/bundler'
require 'capistrano/rails/assets'
require 'capistrano/rails/migrations'
require 'capistrano3/unicorn'
Dir.glob('lib/capistrano/tasks/*.rake').each { |r| import r }
```
## 共通のデプロイ設定
下記のように `config/deploy.rb` を書き換えます。
```
set :application, 'yourapp'
set :repo_url, 'git@github.com:sample/sample.git'
set :rbenv_ruby, '2.1.3'
set :rbenv_type, :system
set :rbenv_path, '~/.rbenv'
set :deploy_to, '/your/app/path'
set :scm, :git
set :format, :pretty
set :log_level, :debug
set :pty, true
set :linked_dirs, %w{bin log tmp/cache}
set :keep_releases, 5
set :unicorn_pid, '/tmp/unicorn.pid'
set :unicorn_config_path, 'config/unicorn.rb'
set :unicorn_rack_env, 'production'
namespace :deploy do
desc 'Restart application'
task :restart do
on roles(:app), in: :sequence, wait: 5 do
# Your restart mechanism here, for example:
# execute :touch, release_path.join('tmp/restart.txt')
invoke 'unicorn:legacy_restart'
end
end
after 'deploy:publishing', 'deploy:restart'
after :restart, :clear_cache do
on roles(:web), in: :groups, limit: 3, wait: 10 do
# Here we can do anything such as:
# within release_path do
# execute :rake, 'cache:clear'
# end
end
end
end
```
## production環境のデプロイ設定
環境ごとに異なるデプロイ設定を記述していきます。
`config/deploy/production.rb`
事前にサーバー側で `deploy` ユーザーを作成しています。
```
role :app, %w{deploy@domain}
role :web, %w{deploy@domain}
role :db, %w{deploy@domain}
server 'SERVER_IP', user: 'deploy', roles: %w{web app}
set :ssh_options, {
keys: %w(~/.ssh/id_rsa),
forward_agent: false
# auth_methods: %w(password)
}
```
設定周りはここまで。
現状、unicorn周りのタスクがよく分かっていない。
あとこの設定だと `bundle install` が動作していない感じ。
次で、デプロイのコマンド等書いていこうと思います。
Capistrano3でRails4のデプロイ(2)
普段使うデプロイコマンドを書き出していきます。
Capistranoのデプロイコマンド一覧
```
bundle exec cap -T
cap bundler:install # Install the current Bundler environment
cap bundler:map_bins # Maps all binaries to use `bundle exec` by default
cap deploy # Deploy a new release
cap deploy:check # Check required files and directories exist
cap deploy:check:directories # Check shared and release directories exist
cap deploy:check:linked_dirs # Check directories to be linked exist in shared
cap deploy:check:linked_files # Check files to be linked exist in shared
cap deploy:check:make_linked_dirs # Check directories of files to be linked exist in shared
cap deploy:cleanup # Clean up old releases
cap deploy:cleanup_assets # Cleanup expired assets
cap deploy:cleanup_rollback # Remove and archive rolled-back release
cap deploy:compile_assets # Compile assets
cap deploy:finished # Finished
cap deploy:finishing # Finish the deployment, clean up server(s)
cap deploy:finishing_rollback # Finish the rollback, clean up server(s)
cap deploy:log_revision # Log details of the deploy
cap deploy:migrate # Runs rake db:migrate if migrations are set
cap deploy:normalize_assets # Normalize asset timestamps
cap deploy:published # Published
cap deploy:publishing # Publish the release
cap deploy:restart # Restart application
cap deploy:revert_release # Revert to previous release timestamp
cap deploy:reverted # Reverted
cap deploy:reverting # Revert server(s) to previous release
cap deploy:rollback # Rollback to previous release
cap deploy:rollback_assets # Rollback assets
cap deploy:set_current_revision # Place a REVISION file with the current revision SHA in the current release path
cap deploy:started # Started
cap deploy:starting # Start a deployment, make sure server(s) ready
cap deploy:symlink:linked_dirs # Symlink linked directories
cap deploy:symlink:linked_files # Symlink linked files
cap deploy:symlink:release # Symlink release to current
cap deploy:symlink:shared # Symlink files and directories from shared to release
cap deploy:updated # Updated
cap deploy:updating # Update server(s) by setting up a new release
cap install # Install Capistrano, cap install STAGES=staging,production
cap unicorn:add_worker # Add a worker (TTIN)
cap unicorn:duplicate # Duplicate Unicorn; alias of unicorn:restart
cap unicorn:legacy_restart # Legacy Restart (USR2 + QUIT); use this when preload_app: true and oldbin pid needs cleanup
cap unicorn:reload # Reload Unicorn (HUP); use this when preload_app: false
cap unicorn:remove_worker # Remove a worker (TTOU)
cap unicorn:restart # Restart Unicorn (USR2); use this when preload_app: true
cap unicorn:start # Start Unicorn
cap unicorn:stop # Stop Unicorn (QUIT)
```
基本的なデプロイするコマンド
```
# prodcutionはデプロイする環境によって変更
bundle exec cap production deploy
```
デプロイする先のデプロイチェック
```
bundle exec cap production deploy:check
```
unicornのリスタート
```
bundle exec cap unicorn:restart
```
使いたい機能は `cap -T` してみるといいと思います。
Grapeを使ってみる
GrapeによるAPI開発
RailsのAPI開発する上で便利フレームワークがあったので使い方を。
だいたいのことはgithubを読めば説明がされています。
[Grape](https://github.com/intridea/grape "Grape")
APIはJSON型でレスポンスを返すようにします。
## インストール
Gemfileに下記を追加
```
gem 'grape'
```
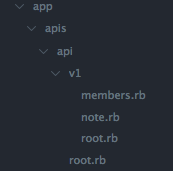
## 今回の構成
ディレクトリ構成はこんな形にしようと思います。
バージョンごとにディレクトリを分けて、更にresourceごとに分けています。

## 設定
`config/application.rb`に下記を追加
```
config.paths.add File.join('app', 'apis'), glob: File.join('**', '*.rb')
config.autoload_paths += Dir[Rails.root.join('app', 'apis', '*')]
```
`config/routes.rb` に下記を追加
```
mount API::Root => '/'
```
これで準備は完了。
## 実装
まず`app/apis/api/`に`root.rb`を新規作成します。
```
module API
class Root < Grape::API
prefix 'api'
mount API::V1::Root
end
end
```
`app/apis/api/v1`ディレクトリ配下にも`root.rb`を新規作成します。
```
module API
module V1
class Root < Grape::API
version 'v1', using: :path
format :json
mount API::V1::Members
mount API::V1::Note
end
end
end
```
`app/apis/api/v1`に`members.rb`を作成します。
```
module API
module V1
class Members < Grap::API
resource :members do
params do
requires :member_id, type: Integer, desc: 'Member ID.'
end
get do
member = Member.find(params[:member_id])
{
member_id: member.id
name: member.name
}
end
end
end
end
end
```
Noteも同じようなこと書いているので割愛します。。
実際のAPIのURLはこんな感じになります。
`http://hogehoge/api/v1/members?member_id=1`
これでmeberのidとnameが返却されてくるはずです。
`resouce`を記述することで、RESTにすることが出来ます。
`get` `post` `put` `delete`と記述するだけです。
`params do〜`で、paramsを指定します。
- requires
- optional
requresは必須パラメータ、optionalはオプションです。
と、今日はここまでで、、、
こんな感じで簡単にRailsでAPIを作ることが可能です。
Rails + Grape + API Keyの認証
RailsでのAPI開発にGrapeを使っていて、シンプルな認証処理を実装してみました。
https://mikecoutermarsh.com/rails-grape-api-key-authentication/
自分で解釈する為に一部コードを変更したものをまとめてます。
## How do works
- ユーザー登録時は、Username/PasswordをAPIにPOSTする
- ユーザー認証し、API Keyを返却する
- その後の全てのAPIリクエストは、API Keyと一緒にリクエストする。
## How do it
### API Keyモデルを作る
モデルを作成してカラムは下記のようにします。
- access_token
- expires_at
- user_id
```
rails g model api_key access_token:string expires_at:datetime user_id:integer active:boolean
```
### インデックスを追加
migrationファイルが作成されていると思うので、 __api_key__ と __user_id__ にインデックスを追加します。
```
class CreateApiKeys < ActiveRecord::Migration
def change
create_table :api_keys do |t|
t.string :access_token, null: false
t.integer :user_id, null: false
t.datetime :expires_at
t.timestamps
end
add_index :api_keys, ["user_id"], name: "index_api_keys_on_user_id", unique: false
add_index :api_keys, ["access_token"], name: "index_api_keys_on_access_token", unique: true
end
end
```
migrationを走らせて実際に適用されているかを確認して下さい。
```
rake db:migrate
```
### Tokenの作成
api_key.rbを開いて、下記のように書き換えます。
```
class ApiKey < ActiveRecord::Base
attr_accessible :access_token, :expires_at, :user_id
before_create :generate_access_token
before_create :set_expiration
belongs_to :user
def expired?
DateTime.now >= self.expires_at
end
private
def generate_access_token
begin
self.access_token = SecureRandom.hex
end while self.class.exists?(access_token: access_token)
end
def set_expiration
self.expires_at = DateTime.now+30
end
end
```
これでAPI Keyの作成時にaccess_tokenが作成され、expires_atが設定されます。
### Authentication helpersをGrapeに追加
APIが呼ばれた際にユーザー認証をする処理をGrapeのhelperに書き足します。
```
helpers do
def authenticate!
error!('Unauthorized. Invalid or expired token.', 401) unless current_user
end
def current_user
# トークンを検索
token = ApiKey.where(access_token: params[:token]).first
if token && !token.expired?
@current_user = User.find(token.user_id)
else
false
end
end
end
```
### GrapeにAPI Key作成処理を追加
__POST /api/auth__ で認証します。
__GET /api/ping__ でAPI Keyが正しいかどうかを返します。
```
# /api/auth
resource :auth do
desc "Creates and returns access_token if valid login"
params do
requires :email, type: String, desc: "Email address"
requires :password, type: String, desc: "Password"
end
post :login do
user = User.where(email: params[:email]).first
if user && user.authenticate(params[:password])
key = ApiKey.create(user_id: user.id)
{token: key.access_token}
else
error!('Unauthorized.', 401)
end
end
desc "Returns pong if logged in correctly"
params do
requires :token, type: String, desc: "Access token."
end
get :ping do
authenticate!
{ message: "pong" }
end
end
```
El Capitan libv8がインストール出来ない
OSX 10.11 El Capitanにアップグレードした際に、Ruby on Railsの環境構築で失敗したので個人的なメモ。
## bundle installで失敗したgem
- libv8
- therubyracer
## libv8のエラー
こんな感じのエラーが出た
```
Gem::Ext::BuildError: ERROR: Failed to build gem native extension.
/usr/local/var/rbenv/versions/2.1.7/bin/ruby extconf.rb
creating Makefile
Compiling v8 for x64
Using python 2.7.10
Using compiler: /usr/bin/c++ (clang version 7.0.0)
In file included from ../src/conversions.cc:32:
In file included from ../src/conversions-inl.h:43:
../src/scanner.h:444:5: error: unused typedef '__StaticAssertTypedef__444' [-Werror,-Wunused-local-typedef]
STATIC_ASSERT(kCharacterLookaheadBufferSize == 1);
^
../src/checks.h:283:30: note: expanded from macro 'STATIC_ASSERT'
#define STATIC_ASSERT(test) STATIC_CHECK(test)
^
../src/checks.h:251:5: note: expanded from macro 'STATIC_CHECK'
SEMI_STATIC_JOIN(__StaticAssertTypedef__, __LINE__)
^
../src/checks.h:240:32: note: expanded from macro 'SEMI_STATIC_JOIN'
#define SEMI_STATIC_JOIN(a, b) SEMI_STATIC_JOIN_HELPER(a, b)
^
../src/checks.h:241:39: note: expanded from macro 'SEMI_STATIC_JOIN_HELPER'
#define SEMI_STATIC_JOIN_HELPER(a, b) a##b
^
:63:1: note: expanded from here
__StaticAssertTypedef__444
...
```
## apple-gcc42のインストール
`apple-gcc42`をインストールすることで回避できた。
```
$ brew tap homebrew/dupes
$ brew install apple-gcc42
$ export CC=/usr/local/Cellar/apple-gcc42/4.2.1-5666.3/bin/gcc-4.2
$ export CXX=/usr/local/Cellar/apple-gcc42/4.2.1-5666.3/bin/g++-4.2
$ export CPP=/usr/local/Cellar/apple-gcc42/4.2.1-5666.3/bin/cpp-4.2
$ gem install therubyracer
```
## インストールされたgemのバージョン
```
$ gem list --local
libv8 (3.16.14.11 x86_64-darwin-15)
therubyracer (0.12.2)
```
あとはいつも通り、`bundle install`すればOK
## 参考
https://www.snip2code.com/Snippet/674372/Fix-libv8-in-El-Capitan